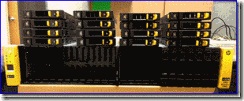
About a year ago I was tasked with expanding one of this first US production StoreServ 7000 arrays and wanted to share the process and shed some light on the "gotchas" involved. This post was sitting in my drafts folder 90% completed for a while now but as many 7000 arrays are starting to be expanded I wanted to complete this post.
The system I was working on it was relatively small since this Financial client was just getting starting with 3PAR storage. We started with a one shelf 16 drive 7200 array (leaving 8 slots open) and the task at hand was to fill the remaining 8 slots with 450GB 10K SFF drives. As depicted in the StoreServ Installation Guide adding drives to the array is a relatively easy process. Overall there are 5 milestones to the process with a majority of them being fully "autonomic", they are:
• Checking initial status
• Inserting Hard Drives
• Checking Status
• Checking Progress
• Completing the upgrade
Checking initial status is pretty much just taking the time to make sure all of the existing drives in the array show healthy, etc (which should be monitored daily anyway). Now, before moving to the Inserting Hard Drives process don’t even think of touching the new drives until you make sure to: **Apply the new hard drive expansion licensing on the 3PAR array BEFORE installing the drives into the system** If you miss this step and go straight to installing the drives you will end up stuck on the "Checking Status" stage with your new drives hung in the "New" state.
If you have accidently installed the drives first we can manually remediate the problem by performing the following steps. (If you did it the correct way just skip down to step 4.)
1. In the first picture you can see that I have 8 new drives that are in the "New" state because I did not initially update the license.
2. Let’s go ahead and fix this by opening up the 3PAR CLI program. (If you don’t have this installed you can grab the installation EXE off the HP website or from the 3PAR System Reporter CD that came with the array.) Once you are logged into the system via CLI you can go ahead and use the "admitpd" (Admit Physical Disk) command. From the screenshot you can see that the output shows the 8 spindles that are sitting in limbo. Let’s go ahead and hit "y" for yes to execute the disk admittance process.
3. You can see that the 8 disks now show to be in the "normal" state. At this point the disk initialization process should kick off. This process will start carving the chunklets on the new drive and make them available to the free space pool. I ran the "showsys -space" command to check the status of the initialization process, as you can see the counter under the Free -> Uninitialized queue was at 0. (Note-there have been cases where the initialization process doesn’t automatically kick off, this can be resolved by running the "tunesys" command which we discuss in the next step.)
4. The "tunesys" (Tune System) command was introduce in 3.1.1 to make it easier for an administrator to perform an "autonomic rebalance" of the array. Tunesys will correct any kind of space usage imbalances in the system and virtually eliminate any "hotspots". Since we added new spindles to the system it isn’t enough that we get the extra space but we really want to use that added horsepower toward I/O, spreading out the chunklets form the existing 16 drives to use these new drives will drive greater performance by having a balanced array that uses all spindles as equally as possible. As you can see running a tunesys after adding spindles is a worthwhile process especially since your Virtual Volume access will be completely uninterrupted.
Let’s go ahead and kick this off by entering in "tunesys" Since we didn’t use any switches this will be a thorough process that will go through all of my Logical Disks, CPG’s, and Virtual Volumes. Please note that a tunesys can take a day or so depending on your configuration, it is best to kick this off on a Friday night or when production access is least. The command "showtask" will display the current status of the tune system process. "Note -You can also run a "tunepd" which will look at each disk to determine if certain spindles are slowing the rest down – we will go more into the "tunepd command soon in another Blog post".
At this point you should be all balanced out and ready for those random workloads!
-Justin Vashisht (3cVguy)


2 Comments
Hey Justin,
Just wanted to clarify this statement:
————————–
. … I ran the “showsys -space” command to check the status of the initialization process, as you can see the counter under the Free -> Uninitialized queue was at 0. (Note-there have been cases where the initialization process doesn’t automatically kick off, this can be resolved by running the “tunesys” command which we discuss in the next step.)
————————–
I am not sure why you recommend Tunesys to be run to initialize chunklets on newly installed disks. There is a separate system process that cleans (or initializes) chunklets. This process is triggered when an LD is deleted or new disks are added.
After adding a drive, we just need to see if admitpd completed. That should initialize all chunklets. If not, a case should be logged to look into the specific situation.
Thanks
Pd
Hey PD, good to hear form you – We had the issue where the init process didn’t kick off (when not adding the licensing right) and that is what support suggested and it did work. Maybe there is some sub-process that kicks it off correctly? Thanks for your message.
Comments are closed.